Pages

sâmbătă, 30 septembrie 2017

The EaselJS java script libraries.

The team development teel us:
A suite of modular libraries and tools which work together or independently to enable rich interactive content on open web technologies via HTML5.
  • EASELJS - working with the HTML5 Canvas;
  • TWEENJS - for tweening and animating HTML5 and JavaScript properties;
  • SOUNDJS -  work with audio on the web;
  • PRELOADJS - manage and co-ordinate the loading of assets and data;
These javascript libraries are used and used to create web content for all modern desktop and mobile browsers.
To include the EaselJS libraries in your project by linking to the CreateJS CDN it is necessary to link them with script tag :
src="https://code.createjs.com/easeljs-0.8.2.min.js"
The official site offers readers only some modest demo about the capabilities of these libraries for creating web content.

miercuri, 27 septembrie 2017

Blender 3D - Open Shading Language tutorial.

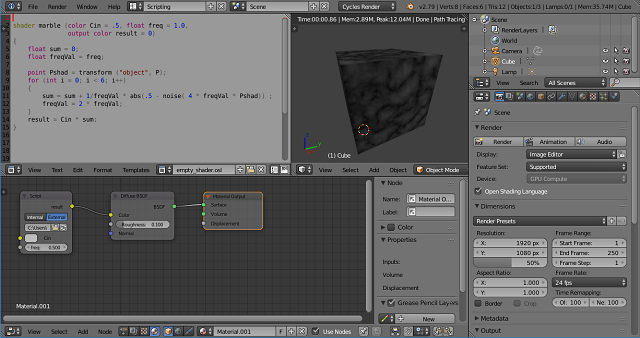
Today, I will show you how to use the Open Shading Language with Blender 3D version 2.79.
Use the Scripting area from Screen layout and Cycles for rendering.
Select from Render tab and check the option:Open Shading Language.
Add your object to test this tool.
For example you can use the default Cube.
Add a material to this object.
The Scripting area from Screen layout come with editor text.
Use Templates - > Open Shading Language -> Empty Shader and add this OSL script:
shader marble (color Col = .5, float freq = 1.0,  
           output color result = 0)  
{  
float sum = 0;  
float freq_value = freq;  

point pixel_shader = transform ("object", P);  
for (int i = 0; i < 6; i++)   
{  
    sum = sum + 1/freq_value * abs(.5 - noise( 4 * freq_value * pixel_shader)) ;  
    freq_value = 2 * freq_value;  
}  
result = Col * sum;  
}  
Save this script into your folder . Add a OSL script interface into Node Editor using : Add -> Script -> Script.
This will come with a open dialog icon to add your OSL script.
Link result to Color from your material Diffuse BSDF. All this steps I tell you is on the next image:

marți, 26 septembrie 2017

The Gimp version 2.9.6 devel .

Today I tested the new devel tool Gimp version 2.9.6 from official website .
For me this graphic tool was stable.
I used version 2.9.6 for windows OS.
I don't test scripts just some of basic features.
Come with a funny install application and a good message for users.
The interface is same but with a dark theme.
The shortcuts keys are the same ( I don't see many changes).
For development option is this GIMP output.
When the application is start show me some errors, so I send all infos to development team.
I used this tool in the past and is great , free , easy to use and with many options.
If you know the interpreting language called Scheme the will love to scripting your Gimp tools.

luni, 25 septembrie 2017

News: Blender 3D - version 2.79

The Blender 3D is an open source software with a great team.
They tell us about this new released version of Blender 3D:
These are the release notes for Blender 2.79, released September 12th, 2017.
  • Denoiser
  • PBR Shader
  • Shadow Catcher
  • Filmic Color Management
  • Faster AMD OpenCL
  • over 700 bugs fixed
  • so much more!
Some features can be found here.
You can also download this 3D software from here.

After you download it, you need to run the install executable for Windows.
If you use a Linux OS then you just run it with: ./blender.
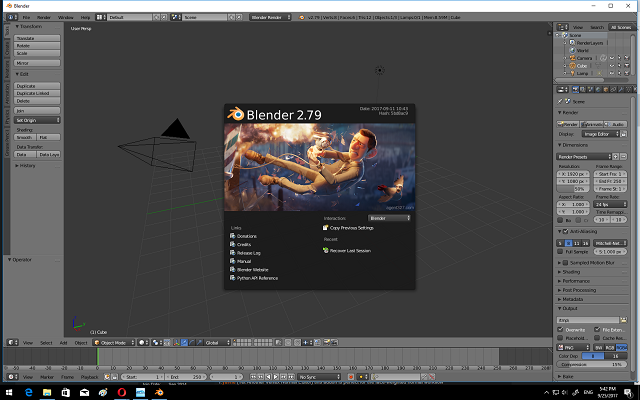
You can the windows of this 3D software tool into the next image:
The next step is to set the Blender 3D from menu: File -> User Preferences ( or use keys Ctr - Alt - U ).
First step:
 - set your CPU or graphic card - GPU into System tab;
 - set your addons to see if works with this version;
 - test all this with a simple example but using all renders: ( Blender, Cycles and Blender Game); 

Some addons I used: ANT Landscape, animation-nodes, blam, blender-light-studio, mira-tools, uvsquares. 
You can find more about this addons blenderartists website.

joi, 21 septembrie 2017

News: Krita 3.3.0 – first release candidate.

This release come with some improvements and features:
  • support for the Windows 8 event API;
  • hardware-accelerated display functionality to optionally use Angle on Windows instead of native OpenGL;
  • some visual glitches when using hi-dpi screens are fixed
  • several new command line options;
  • the performance improvements and selections are fixed;
  • the system information dialog for bug reports is improved
You can read more about this release here.

marți, 19 septembrie 2017

Using processing.js to test ControlP5 .

The ControlP5 is a gui library written by Andreas Schlegel for the programming environment processing.
You can add this library open the processing IDE and under menu select Tools -> Add Tool ... . Use editbox to search the library named ControlP5 .
You can find many examples on official website.
Let's see how is look the Textarea GUI using processing IDE - official website example:


duminică, 17 septembrie 2017

Create 3D text with HTML 5 .

This is the result of this tutorial:

The example is simple and use two ways to draw text.
First use a function how make the text by using index variable to put on canvas same text.
The next use function strokeText to add to canvas the text.
The onload function is used to put on canvas all you need to see.
This is the source code for java script I used into head HTML5 tag :
window.onload = function(){
 var canvas = document.getElementById("3dCanvas");
 var canvasWidth = canvas.width;
 var canvasHeight = canvas.height;
 var ctx = canvas.getContext("2d");
 ctx.font = "20pt Verdana";
 ctx.fillStyle = "black";
 ctx.textAlign = "center";
 // first
 drawTextInCanvas(ctx , "graphic-3d.blogspot.com", canvasWidth/2, canvasHeight/2, 4);
 // the next
 ctx.strokeText('... read this website !', 150, 150);
};

function drawTextInCanvas(ctx, mytext, wdth, hght, dpth){
 var index;
 for (index = 0; index < dpth; index++) {
  ctx.fillText(mytext, wdth - index, hght - index);
 }

 // shadow casting in bottom layers
 ctx.fillStyle = "#30F30F";
 ctx.shadowColor = "black";
 ctx.shadowBlur = 6;
 ctx.shadowOffsetX = dpth+ 2;
 ctx.shadowOffsetY = dpth+ 2;
 ctx.fillText(mytext, wdth - index, hght - index);

}
Then add the canvas tag into body tag with this :
id="3dCanvas" width="400" height="200" style="border:1px solid black;"

Website tool for chemical data and infos.

Another website tool for chemical graphics and cheminformatics library.
The development team tell us:
The ChemDoodle Web Components library is a pure Javascript chemical graphics and cheminformatics library derived from the ChemDoodle® application and produced by iChemLabs. ChemDoodle Web Components allow the wielder to present publication quality 2D and 3D graphics and animations for chemical structures, reactions and spectra. Beyond graphics, this tool provides a framework for user interaction to create dynamic applications through web browsers, desktop platforms and mobile devices such as the iPhone, iPad and Android devices. This library also has complete access to the entire ChemDoodle desktop API through AJAX, allowing for quick access to one of the most robust chemical graphics and informatics packages in existence directly through Javascript. The goal of the project is to utilize the next-generation HTML5 technologies to power the scientific and educational applications of the future. iChemLabs is dedicated to funding, developing and hosting this library and has released it for free under the open-source GPL license. By releasing ChemDoodle Web Components open-source, yet continuing to financially support the library, iChemLabs ensures that the next generation of scientific applications is easily achievable by academia, government and industry, and helps to make sure that the cost of education decreases while using the web to further spread science.
This tool can be found on this website.

sâmbătă, 16 septembrie 2017

The Santa Tracker website for kids.

This website will help with the education of the children and more so will prepare you for the winter holidays.
Start in this adventure by clicking on the icon with the upper left lines and you have access to Santa's surprises.

vineri, 15 septembrie 2017

Using processing.js to make a rotating ball effect .

This tutorial show us how to make a rotating ball effect. You can see the background is not black and the reason is the background is set just into setup function. Another part of this effect is the rect function from draw. This rect will clean the ball. The ball is a ecllipse function with a size a 10. The pushMatrix function pushes the current transformation matrix onto the matrix stack.
float angle;
int dist_ball = 100;

void setup() {
  size(800, 600);
  background(0);
}

void draw() {
  fill(20,20);

  noStroke();
  rect(0,0,width, height);
  fill(255);

  translate(width/2, height/2);

  rotate(angle);

  pushMatrix();
   rotate(angle);
   translate(dist_ball,0);
   ellipse(0, 0, 10, 10);
  popMatrix();
 
  angle += 0.1;
}
The result is this effect:

Chrome - fix WebGL issue.

This error can be show you with Chrome browser.

To fix this you need to try this ways :
First, You need to open into browser settings into new tab: chrome://settings .
See if the Use hardware acceleration when available under Advance is set to True, if not then set this to True .
Take a look at chrome://gpu into new tab and see if is something with red color.
This may be a problem and try to see what is this error. Also check the chrome://flags and wee the WebGL options you have it.
For example: I fix my WebGL by enabling the WebGL Draft Extensions even the webgl CheckerImaging: Disabled is show with the red color on tab chrome://gpu.
This can be enable under chrome://flags.
The WebGL Draft Extensions Mac, Windows, Linux, Chrome OS, Android allow us:
Enabling this option allows web applications to access the WebGL Extensions that are still in draft status.

miercuri, 13 septembrie 2017

Using processing.js to make a clock.

Is a simple way to make and test processing.js online by using this online tool.
First you need to sign in into your account and use button : Create a Sketches .
This will open your open the editor. Now you need to add this source code:
void setup() {
  size(200, 200);
  stroke(10);
  smooth();
}
void draw() {
  background(255);
  fill(0);
  noStroke();
  // Angles for sin() and cos() start at 3 o'clock;
  // subtract HALF_PI to make them start at the top
  ellipse(100, 100, 160, 160);
  float s = map(second(), 0, 60, 0, TWO_PI) - HALF_PI;
  float m = map(minute(), 0, 60, 0, TWO_PI) - HALF_PI;
  float h = map(hour() % 12, 0, 12, 0, TWO_PI) - HALF_PI;
  stroke(255);
  strokeWeight(1);
  line(100, 100, cos(s) * 72 + 100, sin(s) * 72 + 100);
  strokeWeight(2);
  line(100, 100, cos(m) * 60 + 100, sin(m) * 60 + 100);
  strokeWeight(4);
  line(100, 100, cos(h) * 50 + 100, sin(h) * 50 + 100);
}
The source code is simple:

  • one first function setup will set size area and some line settings; 
  • the draw function loops continuously to draw your work. 

Into the draw function I create a clock design and the movement is follow by time.
Because this is analog clock , I used sin functions to move the line to show the analog clock hands for time.
Take a look into the right area and will see three vertical dots.
Use mouse and a side panel will show you. In this panel you can set Settings and upload Files.
The Settings will come with the Mode to set the javascript - P5js/Processingjs and Tabs to show/hide your work.
Let's see how is working:

marți, 12 septembrie 2017

The Lithosphere Terrain Generator.


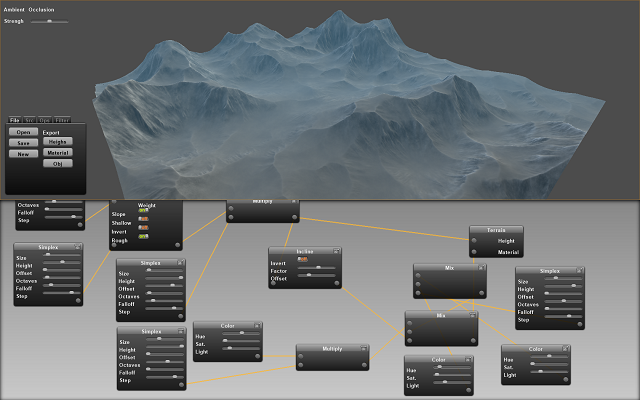
This is a 3D software for terrain generator named lithosphere.
Is simple to use it because use nodes.
You to create and export material textures and heightmaps intended for use in realtime graphics applications.

Features

  • Realtime terrain modification
  • Save/Open of scene.lth files
  • Simplex noise height source
  • Wind and Erosion algorithms
  • Gaussian Filtering
  • Mixing and Adjusting
  • Mathemathical operators
  • Float array and DXF mesh export
  • PNG texture export

Requirements

Lithosphere requires a fast computer and graphics card to operate. It also requires specific opengl compatibility
  • OpenGL shading language version 1.20
  • GL_ARB_texture_float
  • GL_ARB_pixel_buffer_object
  • GL_ARB_vertex_buffer_object
  • GL_ARB_framebuffer_object

Recommended system specs

  • Intel Quad Core CPU
  • 2gb RAM
  • Nvidia Geforce GTX-285
  • 1gb video ram

Working with

  • Nvidia Geforce GTX-285
  • Nvidia Geforce 8800 GTS
  • Nvidia Quadro FX1700 512mb

sâmbătă, 9 septembrie 2017

Opera : Make an animated wallpaper.

In this tutorial I will show you how to make your animated wallpaper for Opera browser.
First you need to create a folder.
In this folder you need to have three files:
  • one video file that is show on browser named: video.webm;
  • one file with a same size like video file named: cover.jpg;
  • one file named : persona.ini;
The image file cover.jpg is the first frame from video file: video.webm.
The file named persona.ini come with this text:
; Licensed under CC-BY 
; Video by cascada internet gif 
;
[Info] Name = yourwallpaper 
Author = Your name 
Author URL = Your URL website 
Version = 2 
[Start Page] Background = video.webm 
Position = center bottom 
[Web UI Pages] Background = cover.jpg 
Position = center bottom 
I used Blender 3D to make my video and extract the first image for cover.
You can find many tools on web to solve this issue.
Unzip all this three files into one zip named: yourwallpaper.zip.
You can test your animated wallpaper using drag and drop into wallpaper area from your browser.
Also , you can upload it to Opera browser addons.
You can download this animated wallpaper from here.
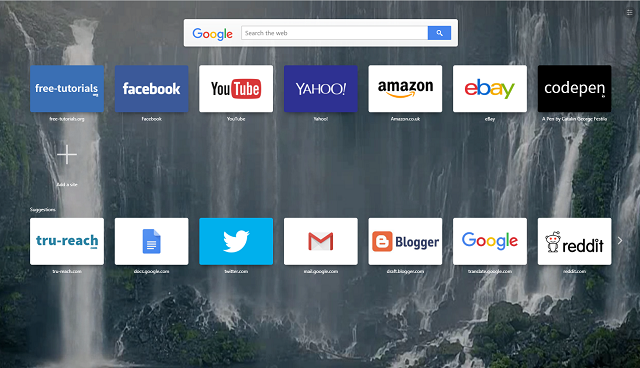
I used a animated gif of Shiraito Falls (is a waterfall in Fujinomiya, Japan) from internet and Blender 3D to make my own animated wallpaper for Opera browser.

vineri, 8 septembrie 2017

The Magic Actions for YouTube addon .

The Magic Actions for YouTube is an addon that makes a beautiful dynamic lighting effect around the player on YouTube and come with many features for videos:
This addon can be used with Opera , Firefox and Chrome and can be found here .

miercuri, 6 septembrie 2017

Try processing js on Android OS.

If you like to code in processing.js, then this application will fulfill your wish on your phone or tablet with android operating system.
The APDE - Android Processing IDE requires the following permissions:
  • modify and delete the contents of your USB storage - required to save sketches to the external storage 
  • control vibration - required to provide haptic feedback, which can be turned off in Settings 
This includes a quick-run JavaScript - Sandbox and a tutorials that are explained in more details.
The development team from CalsignLabs has just one person.
This tell us about this alpha released application:

APDE (Android Processing Development Environment) is an integrated development environment for creating Processing sketches on your phone/tablet. APDE supports the full edit, compile, and run cycle. You don't need a computer or an SDK to start coding on the go.

The application can be found on google play here.

marți, 5 septembrie 2017

Huge image with earth map .

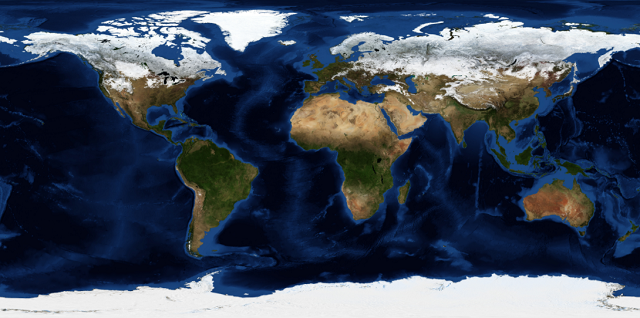
You can get a huge image with earth from here.
The resolution of this image is 21600x10800 and the size on hard disk is 28.3 MB . See a smaller version of this image:

The photopea - web tool.

Today I will introduce you a new web tool for drawing and graphic processing from photopea website.
This web tool resembles a very familiar program.
Also, this tool comes with some simple filters and keyboard shortcuts.
It can export some types of classic files (PNG, JPG, SVG, WEBP and GIF) as well you can save to PSD type file.
You can take a webcam picture and publish to web.
You can register as a free account or paid account .
You can test and run the java script and come with few simple examples.

luni, 4 septembrie 2017

The SVG editor - web tool .

If you want a SVG editor the you can test this web tool from  here.
The web tool named SVG-edit is a fast, web-based, javascript-driven SVG drawing editor that works in any modern browser.
Is more simple like Inkscape and can be used online.
Also you can download it and test it like stand alone tool .
I try to use Export and Save Image , but seem not work with Opera browser.
I solve this issue with key U - Apply Changes and then with Copy - Paste into new SVG file.

The G'MIC - web tool .

This webtool allow you to test the G'MIC tools for images.
As you know the G'MIC is a set of tools to change image and use effects.
G'MIC is an open-source product developped and hosted at the GREYC research lab.
Let's start with Open file ... and then select the filter to change it.
The tool come with 343 filters and each filter can be change it from parameters.
When you finish it use Render full image button and the Download button .